Potato
links: Food reference: 4-22-2021
Potato #
- Its protein is very rich, Peat once said even better than egg yolks. It is also rich in keto acids. The yellower the potato, the more protein?
- 30-80% of the Solanine is in the peel.
- Boiling is a neccesity as baked starches can persorb across the intestinal epithelium.
- Other tubers contain a decent amount of Amylose starch, which can induce bloating/gas/brain fog.
- Potatoes with less Amylose and less Amylopectin are easily digested and are fluffier and whiter. Those with more amylopectin are waxier, sweeter (I think), and darker yellow, and favor boiling.
- Young (creamer/fingerling) potatoes contain less starch than mature.
Gardening #
- 8-10 gallon containers. 3 plants per 10 gallons is doable.
Sweet potato #
- Interesting recipe for that birthday cake texture: cook at really low temps (235-338°F) for several hours. Or maybe one hour, but leave sitting in the warm oven for several hours. This makes a ton of maltose. RPF
-
https://raypeatforum.com/community/threads/vegetarians-look-so-young.35308/post-947879
- Steam on the stovetop for ~105 minutes. (Boiling also might not be a terrible idea?)
- Peel and dice them. Coat in coconut oil. Lay on a baking sheet and roast at 425° for 25-35 minutes, flipping once halfway through. Caky on the inside, caramelized and crispy on the outside (eh… but doable if not excessive)
- The idea around consuming them with fat is that it slows the absorption. More stable on the blood sugar or something? But I don’t know how that affects Endotoxin is the thing.
- Sweet potatoes are not nightshades! They’re perennial herbaceous vines. Sweet potato has higher gelatinization temperature, less water absorption, smaller particle size. Potatoes have ~0.5-1g resistant Starch per 100g. Sweet potatoes? Apparently 0.1 or so according to some sources
-
Purple sweet potato color inhibits endothelial premature senescence by blocking the NLRP3 inflammasome
- Down-regulates ROS accumulation and the NLRP3 inflammasome functions … However, once the NLRP3 inflammasomes are overactivated, PSPC could not restrain cell senescence.
-
Changes in sugar composition during baking and their effects on sensory attributes of baked sweet potatoes
-
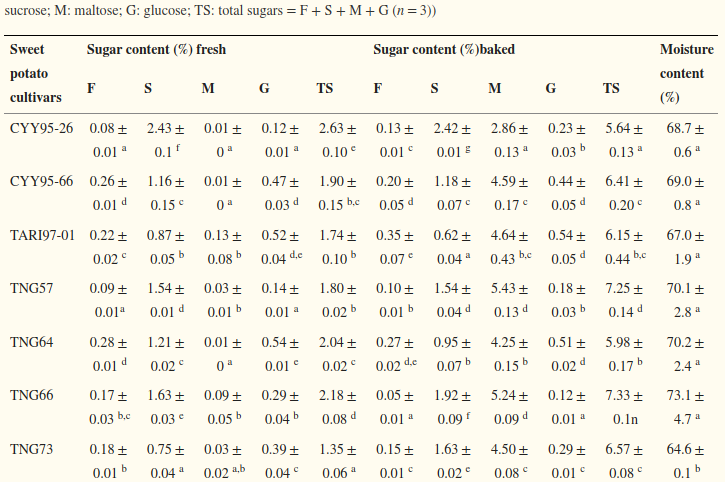
- So a few % rise in total sugar, and it seems this is mostly thanks to Maltose, which is high as fuck GI compared to sweet potato (100 vs 60 or something).
- Ivan B says boiling prevents this production of sugar.
-
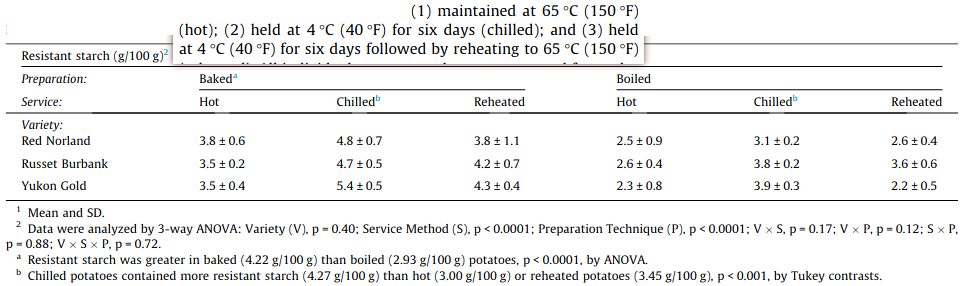
- Resistant starch analysis of commonly consumed potatoes: Content varies by cooking method and service temperature but not by variety
- ~80% of the protein is Sporamin, a Trypsin inhibitor and antioxidant. Also resists pepsin. Removed by cooking; idk to what degree.
Gardening
 #
#
- Overfertilizing won’t help with the tubers so much as top growth.
- Don’t worry about damage on the leaves. There are pests for the tubers, though.
- 5-10lbs per plant ideally. So let’s get 100 of them going for a years supply (that’s actually not crazy insane).
- Something like 6 slips per 20 gallon container; I’m seeing 15+ gal as the recommended minimum. ~18 inches deep ideally.
- Murasakis root deeper than other varieties.
- https://www.homedepot.com/p/HDX-20-Gal-Storage-Tote-in-Ink-21204415708/311021551
-
https://homegrownfun.com/how-to-grow-25-pounds-of-sweet-potatoes-in-one-grow-bag/
- Bear in mind it doesn’t have to be that deep as they do not go deep - wide is actually really important. Skinny and tall bags are for regular potatoes.
- Filled 100 gallon bags half way (12" deep with soil); gotta get that width
- Add extra material above soil level so that soil doesn’t wash out onto the ground when it rains/watering
- Something like 6 slips per 20 gallon container; I’m seeing 15+ gal as the recommended minimum. ~18 inches deep ideally.
- If you’re not using black plastic, mulch the vines 2 weeks after planting to smother weeds, conserve moisture, and keep the soil loose for root development.
- Mulching sweet potato plants with black plastic helps keep the soil as warm as possible, and it also prevents the vines from setting down more roots as they grow, which takes energy from tuber formation (making numerous undersized ones instead yknow?) For that you can also lift long vines outside the soil - they never need pruning.
- Marigolds in the general area will repel pests https://www.epicgardening.com/sweet-potato-companion-plants/
Rooting/Slips #
- Wait until soil is 60°; night should be >~55°, or a few weeks after last frost date. For me this is early-mid May.
- Start slips 2-3 months before planting. Something like February/April until May
-
https://www.youtube.com/watch?v=0igp5IzO21g
- Bin of moisture-retaining potting mix (i.e. HP promix
 ) in a plastic bin from walmart. Keep it closed for humidity but open it. Get sun for at least 6 hours a day (not in front of a window, as that blocks UV).
- When you squeeze it, it should keep its shape like a snowball, but no water drips out.
- After preserving the slips in a glass of water, you don’t have to keep them in there, though some may recommend you to. The water must also be changed every few days.
- 9:57 for guide on how to separate by the rootnodes. I dunno if you have to stick
- Plant towards evening so that they have all night to acclimate. They must also be kept wet, watering daily.
- Bin of moisture-retaining potting mix (i.e. HP promix
- Do not rotate them. The roots can be really invasive as they survive the winter.
- Don’t plant leaves underground, as those nodes will go to form the tubers. Just leave a few leaves sticking out.
Soil #
-

- Sandy loam = 60% sand, 30% silt, 10% clay (important; below 20%). (AKA basically equal parts sand and loam?.) Realistically more like 50% clay, 20% clay/silt, 20% organic matter.
- Loam is basically “soil”; it’s well-proportionated and will support basically any plant.
- Quikrete all-purpose sand is coarser than play sand. ‘Coarse sand’ is what’s called for generally. Make sure the sand is washed (it is).
- Adding sand to the soil facilitates drainage. Be mindful of hydration: Rich, crumbly soil; do not overwater. Hard soil will give problems if it emerges to the topsoil. Too wet and it will get rotten, but they like being moist.
- 50% earth, 50% coco coir/peat moss (they’re similar). OR, potting mix.
- Soil: 2-3/6/6 NPK. Too high nitrogen will cause the leawes to grow a lot. I think 6 is considered high P. pH 5.5-6.8.
- 2-3 nitrogen feedings is plenty.
- Fill the container halfway, add a few handfuls of organic fertilizer (~5/5/5), fill the rest, then another handful.
-
https://www.youtube.com/watch?v=cx9fGYEF2aw guy used Foxfarm Strawberry Fields (why this over other foxfarm soils? idk) + literal sand + woody compost.
- Make sure not to overwater the slips!!
-
https://www.youtube.com/watch?v=qWlnFPHxDcs potting pix + perlite (for air) + manure/compost + bone meal
- The bone meal is big for the phosphorus for tuber development
-
https://www.youtube.com/watch?v=XhcbQ8X_JqY 75% sawdust, 25% coarse sand. Used the Mittleider system:
https://www.gardeningknowhow.com/edible/vegetables/vgen/mittleider-garden-method.htm which is basically inspired by hydroponics. Soilless with i.e. 50-75% sawdust (or peat moss) + remaining part sand/perlite. and very regular fertilizer/nutrients.
- OKRaw’s gardening channel: 6 Reasons Why I Don’t Use the Mittleider Garden Method fuck that shit and get trace minerals like Gaia Green glacial rock dust which he gets 50lb $16 ($30 now cuz inflation)
- 50% sand, 50% peat moss/coco.
- 100 gallons sand = $120 (27x 50lb bag)
- 100 gallons peat moss = $80 ()
- 40% sand, 40% peat moss/coco, 20% perlite/pumice.
- 80 gallons sand $100 (22x bag)
- 80 gallons peat moss/coco (doesn’t come so cost-effective like that so $80 again)
- 40 Gallons Perlite/pumice
- $80 (30gal $43 + 10gal $25) https://www.htgsupply.com/products/pahroc-giant-perlite-3/
- 60gal $85
- Mother Earth Coco-perlite = 70%/30%. I would have to add a bit of peat moss for 66/33. So:
- 80 gallons of sand = $100
- 120 gallons coco+perlite = $144 (9 bags at $16 each)
- Maybe Rob gets them cheap, who knows
- https://growgreenmi.com/mother-earth-coco-perlite-mix-50-liter
- 22 gallons peat moss = $20
- The question is if it’s cheaper than pure peat moss + perlite. Quite possibly not.
- D:
- 80 gallons sand
- 60 gallons peat moss/coco
- 40 gallons perlite/pumice
- Can float to the top so kinda sus
- 20 gallons vermiculite/turface
- Unlike perlite, it holds nutrients and contains trace elements, and holds water better.
- According to ChatGPT’s calculations this formula would get me into the ideal pH range:
- 50 (44) gallons peat moss
- 40 (46) gallons coco coir
- Seems to be cheaper from Depot
- 80 (82) gallons sand
- 30 gallons perlite
- Coco might be weird to work with, idk. In which case (which is $20 more expensive):
- 80 (44) gallons peat moss
- 80 (82) gallons sand
- 40 gallons perlite
- OR to save $30:
- 90 gallons peat moss
- 80 gallons sand
- 30 gallons perlite
- Also gotta cop some rock phosphate andor rock dust. Limestone is also hella high calcium.
Finally, Obamium #
- The Veganpermanently special:
- 120 gallons Coco coir (126)
- Could be 9 bags of the 50L mother earth stuff
- 7x5kg (18gal) bricks = 126
- Up to 40 gallons sand (and rocks at the bottom of the bed)
- 11 bags = 41.2 gallons
- 30 gallons perlite
- 1 bag ME = 9.2 gal coco + 4 gal perlite, which is achieved in 8 bags (7.5) with 73.6 coco as well so 46.4 to go (3.5 bags, so probably call it 3).
- 30 gallons from 1 viagrow bag
- 10 gallons biochar (grind it up as much as possible)
- Coco coir is far more sustainable and environmentally friendly. But, it grows pathogenic fungi which can be prevented with 5% charcoal in the mix (which supports mycorhizzal growth, so it’s probably probiotic).
- This might only be because it’s porous. Not like vermiculite is cheaper though.
- Allows it to store
- 7.5 gallons from 1 Vermont Organics bag
- Coco coir is far more sustainable and environmentally friendly. But, it grows pathogenic fungi which can be prevented with 5% charcoal in the mix (which supports mycorhizzal growth, so it’s probably probiotic).
- Fertilizer of choice (if worm castings use at least 20%)
- 120 gallons Coco coir (126)
- So, per grow bag:
- 30 gallons coco coir
- 1.66 bricks
- 10 gallons sand
- 2.66 bags
- 7.5 gallons perlite
- 1/4 bag
- 1.75 gallons biochar
- 1/4 bag
- 30 gallons coco coir
- Then, mix 6,25 cups of the Back to the Roots stuff into the top 6-8 inches.
- 3-4 weeks after planting, apply the nitrogen-rich fertilizer as top dressing. 6.25 cups (bag says 2 tbsp per gallon). Water it in.
- 8 weeks: BTTR as side dressing (3.125 cups)
- 10-12 weeks: BTTR as side dressing (3.125 cups)
- That’s 12.5 cups total per grow bag. ChatGPT estimated like 10 cups per bag. And then 24 cups of Native Soil, which = 2 bags.
Water #
- Saucers aren’t a bad idea for both water retention and making sure it doesn’t root into the ground below.
-
https://www.backyard-vegetable-gardening.com/fertilizing-sweet-potatoes.html
- 1 inch of water a week, until 2 weeks before harvesting.
- If 3 inches into the soil is dry, it’s ready to water.
- Early morning watering is best, so that the sun can evaporate any water off the leaves to keep fungal infections at bay.
- Use water-soluble fertilizer, but granular is good when the plants are still small. 3 doses through the growing season is sufficient every 1-1.5 months or so
Harvest #
- Murasaki: 100-120 days. Stokes: 120-140 days. Okinawa: 120-180. Harvested typically when the (tips of the) leaves turn yellow/brown. Good thing about harvesting is that frost can kill the vines without harming the roots. Pick a dry day.
- After harvest, this guy pretty much put all the bad tubers, vines, etc. back into the raised bed with some bloodmeal and let the majority of it compost down to enrich the soil, and have the vines sprout for the next harvest.
- Cure them for 2 weeks after harvesting: keep them >=80°F and high humidity (90%) without touching each other. After this, they form a suberin protective coat that allows them to remain unspoiled for up to a year, which is ~55-65F and dry.
- So yeah, this means in the grow room somewhere. And then into the pantry I suppose, then the garage during fall, and back in the pantry during the home stretch towards winter I suppose.
- Plant anew every 2-3 years to prevent accumulation of soil-bourne pests/diseases. Else, replace the topsoil, which is where organic matter is rebuilt and cycled.